Thursday, August 28, 2008
Aardbalm - Formaldehyde Free Embalming
AARDBalm is an alternate embalming and sanitising medium designed from within the funeral industry, for the funeral industry. The design criteria being to create a product that would provide the grieving parties with comfort whilst also meeting the embalmers needs. After four years of research, and the rejection of possible materials, a product group was identified and trialled. In-house trials were of two year duration resulting in a product suitable for practical testing. Those practical tests were undertaken by independent practicing embalmers; two years later the product was perfected. The basis for the product being a long polymer marine originated material used as the carrying medium for the other naturally occurring ingredients. All of the ingredients being non toxic in use or disposal. Administered as a normal embalming procedure the results achieved will provide an appearance for the deceased as being asleep. AARDBalm is not a long term embalming solution, it is a sanitising process post death pre-burial. It will not dehydrate the body, it’s properties will naturally rehydrate thus providing a more natural appearance of the deceased. The product is easy to use and does not require retraining or a change of methodology in any form for the embalmer. It will initially take a little longer to use, for like all product change, expediency with a new product is achieved with familiarity. It will, however, allow the embalmer to dispense with the current requirement for protective clothing, and necessity for extractor fans to meet the current requirement for numerous air-changes. Significant other benefits are: Environmentally Safe Biodegradable Non-infectious Non-toxic
Stiff By Mary Roach
For 2000 years, cadavers, some willingly, some unwittingly, have been involved in science's boldest strides and weirdest undertakings. They've tested France's first guillotines, ridden the NASA Space Shuttle, been crucified in a Parisian laboratory to test the authenticity of the shroud of Turin and helped solve the mystery of TWA Flight 800. For every new surgical procedure, from hear transplants to gender reassignment surgery, cadavers have been there alongside surgeons, making history in their quiet way.;Mary Roach visits the good deeds of cadavers over the centuries, from the anatomy labs and human-sourced pharmacies of medieval and 19th-century Europe, to a human decay research facility in Tennessee, to a plastic surgery practice lab, to a Scandinavian funeral director's conference of human composting. In doing so she tells the story of our bodies when we are no longer with them.
More details
Stiff: The Curious Lives of Human Cadavers
By Mary Roach
Published by W. W. Norton & Company, 2003
ISBN 0393324826, 9780393324822
303 pages
(Google Book Reader)
Thanatology
Thanatology is the academic, and often scientific, study of death among human beings. It investigates the circumstances surrounding a person's death, the grief experienced by the deceased's loved ones, and larger social attitudes towards death such as ritual and memorialization. It is primarily an interdisciplinary study, frequently undertaken by professionals in nursing, psychology, sociology, psychiatry, social work and veterinary science. It also describes bodily changes that accompany death and the after-death period.
http://en.wikipedia.org/wiki/Thanatology
http://en.wikipedia.org/wiki/Thanatology

The Infamous Jerome White Guarantee
Dear Goth aficionados (and aficionadas too!) embalmers, Bostonians, lovers of Victorian culture and literature and those of you who are just plain weird, here is the infamous Jerome White Guarantee
When embalming a case that had a head "post" (autopsy), I used to offer funeral home directors my guarantee:
~~~~~~~~~~~~~~~~~~~~~~~~~~~~~~~~~~~~~~~~~~~~~~~~~~~~~~~~~~~~~~~~~~~~~~~~~~~
Many people ask me; since you inject fluid into the circulatory system, do men get an erection when you embalm them?
My standard reply was:
Bill would always answer
When embalming a case that had a head "post" (autopsy), I used to offer funeral home directors my guarantee:
"If this head leaks, I will eat my shoe.”
In all my years, I never ate a shoe, but have licked many, many boots…that, of course, is a different story.~~~~~~~~~~~~~~~~~~~~~~~~~~~~~~~~~~~~~~~~~~~~~~~~~~~~~~~~~~~~~~~~~~~~~~~~~~~
Many people ask me; since you inject fluid into the circulatory system, do men get an erection when you embalm them?
My standard reply was:
"Only if they found me attractive."
My late friend and fellow embalmer, Bill Carter was often questioned by the relatives of deceased clients if he did hair.Bill would always answer
"Honey, yes! I’m the one who put the 'boo" in “bouffant!"
JEROME WHITE'S EMBALMING TIPS
 Jerome White | May I share Jerome White’s helpful embalming tips with you? Jerome is a former mortician who worked for over twenty years in the Northern and Southern California area. He guided me through the very complex embalming process and is a literal fount of information about embalming practices. A very special thank you to Jerome for all his help and for sharing is knowledge with me. Be sure to check out Jerome's Guarantee at the bottom of the page! -Francesca Miller |
| | ||||
| | Preparing the Remains for Embalming Remove any bandages, ties (holding hands and feet together etc.), Rinse the remains off and wash with a slippery soap. Clean eyes, nose and mouth with water and disinfectant. Close eyes (may embalmers lightly coat the eye caps with petroleum jelly to help keep the lids shut and to inhibit dehydration). Back then, when a the deceased was suspected or had TB, the mouth and nose would often be covered with a cloth wet with some antiseptic. This would theoretically stop any bacteria or viruses from escaping from the moth and nose during embalming thereby reducing the risk of embalmer contracting TB. Position the deceased as they will be in the casket. The idea is to make someone look as if they are at rest. Their head should not be too high, nor too low. Their hands and fingers should look like they are resting comfortably on one another. Break out any rigor mortis in the hands, arms and neck by gently flexing the fingers, wrist elbows, shoulders and turn the head back and forth and up and down. Place the head on a head block, and elbows on arm or head blocks. Position, the right hand over the left wrist. In theory, the right elbow should be half as high as is the top of the abdomen from the table. If the left is over the right, you can look down the deceased’s sleeve! Can’t have that! If the deceased needs a shave, now is the time. Lather ‘em up then carefully shave the face. Making cuts or what a live person would call razor burn causes problems. Cuts and abrasions will dry out and discolor. The least you have to cover up, the better the deceased will look, so you must always be careful when shaving. To close the mouth of the deceased, you pull up the upper lip and, staying as close to the bone as possible, insert the needle through the top of the gum and out of the nostril. Carefully insert the needle into the same nostril and go through the septum and out the other nostril. Reinsert the needle in a downward way into the second nostril and go down through the skin into the gums below the second nostril. Now your ligature will be a loop going from inside the mouth up into the nose, through the septum and back down into the mouth. Next, pull out the lower lip and, again, as close to the bone and as deep into the chin as possible, insert the needle in one side of the front of the lower jaw and up the other side. Then, pushing with your hand on the chin, close the mouth until you feel it looks natural and tie ligature only as tightly as to keep the shape of the lips. Clip off the excess ligature and tuck into the mouth. You can hold the lips together with petroleum jelly or other tacky substance. It is important for the mouth to not look like it is being held closed by the lips, but to be natural. Hence, using the needle as deep to the bone as possible as to not show the skin pulling on the ligature. |  | ||
| | ||||
 | Arterial Embalming The two most common injection and drainage sites in an un-autopsied body are the right carotid/jugular and right femoral artery and vein. The brachial, axillary, ulnar and abdominal aorta are rarely used. Only when these other two sites can’t be used due to disease or injury would one use one or more of these. The only reason I would ever use the abdominal aorta was to embalm a body strictly for preservation (like a decomposed body). Well, back to the neck. Turn the head slightly to the left and make an incision that is workable, but no longer than needed one quarter the distance from the juncture of the clavicle and sternum. Cut from the center of the body out and approximately one half inch higher than the clavicle. By making the smallest incision for you to work, you have the least to deal with when sewing up and, in the case anyone with an open collar or a dress with a low neckline dress, easier to cover with wax. With two aneurysm hooks gently separate the tissue below the skin until you can see the jugular vein. Carefully separate the tissue between the jugular vein and carotid artery. Then separate all tissue around both vessels and run ligature under each. I used to use two ligatures on each as an added protection from leakage by tying off the open vein and artery from the incision in them. Once you have secured the artery and vein, make another, small as you can work with, incision into the artery and insert a cannula (embalming needle that is going to be hooked up to the hose from the gravity jar or machine). Tie the cannula in place with the ligature you have around the artery. Veins are extremely thin and fragile. Pull the vein up with your ligature gently make a small incision in the vein. Insert jugular forceps or a drain tube. I think they had those back then. The forceps are for pulling blood clots out of the heart. Jugular forceps are about 12” long and can reach directly into the heart. They also keep the vein open for better drainage. | | ||
| | ||||
| | Aspirating and injecting cavity fluid Once you have this done, you are ready to start injecting. Using a gravity jar, you would turn the valve on the hose to stat the fluid going. As the fluid starts to enter the body, you go to work massaging the legs, arms, neck, hands, and fingers. A good slippery soap is good to use. Old peoples skin is very thin and can tear easily. You don’t want to injure the deceased. All of this is to assist the flow of embalming fluid to all parts of the body. Often large clots need to be pushed through the system. Using your hand, you start at the feet, squeeze the tissue and push towards the heart. Do the same with the hands and arms. When not working with the hands and arms, keep them in position on their blocks. The remains will clear out. In cases of old people or those with distended veins, you can see the fluid going through them. Also, with experience, you can tell how well the embalming is coming along by the touch. When you are satisfied the remains has had enough fluid, turn off the flow take the cannula out of the artery and reverse it, going up the right side of the neck. While you sometimes get enough circulation from only injecting down the carotid, the right side of the face and neck might not get enough fluid. So, you can inject a small amount up into the right side of the face and head, just to be sure! We used to call this a “head shot”. When you are done with the arterial work, it’s time to tie off the vein and artery so they don’t leak and close the incision. Some embalmers close the incision prior to aspirating the remains; others do it afterwards. It’s six of one and a half dozen of another, your choice. Since the circulatory system in the abdomen is so complex and the lungs often contain fluids, the embalmer needs to aspirate the thoracic and abdominal cavities and then inject a very strong embalming fluid to fix the internal organs. The embalmer hooks up a trocar to a hose connected to an aspirator. Insert the trocar an inch above and to the left of the umbilicus and in a back and forth motion, puncture all the organs and aspirate out all fluid possible. When done, using the same trocar, hook the hose from the gravity jar (now filled with cavity fluid) and inject a quart or so into the cavities. You don’t want to inject any more than needed because you might cause the remains to purge (fluid coming out of the mouth and/or nose) It’s not a good thing during the viewing! In the late 19th century, embalmers would use a “purse string” suture to secure the hole left by the trocar. If you hadn’t closed the incision site, now is the time. Dry out the inside of the incision with cotton and fill with an absorbent compound. In the late 19th century, they used talc and sawdust or similar substance that would soak up excess moisture that lessens the possibility of leaking from the incision. The old baseball stitch was my favorite to use. Nice and tight! |  | ||
| | ||||
| Finishing up! Once done, rinse the body off, “roll” them up and rinse underneath so you don’t find yourself dealing with a nasty blood clot stuck underneath when dressing! I hate when that happens! Wash, comb and set the hair if needed. Make sure the remains are still properly positioned, apply a face cream to the face and hands and cover the deceased. At all times, respect for the deceased should be maintained. The genitals and breasts of females should only be exposed when necessary (washing the body). Bodies do not move or twitch. They are dead. They may “fill out” a bit in the hands and face, but they don’t move. http://www.thebostongothicbook.com/Embalming.html |  | | ||
The 5 Stages of Embalming
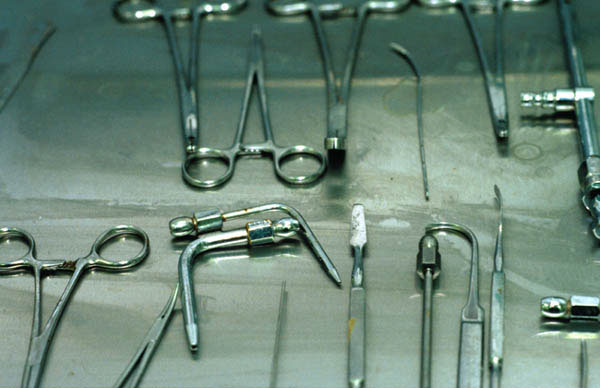
[WARNING: Contains disturbing images] Okay - this is a fairly morbid topic but a very interesting one. Embalming is not required by law in many countries, but it is often performed for the benefit of loved ones. An embalmer has the very responsible task of ensuring that family members are not left with an undesirable last memory of their loved one. These are the five steps involved in the embalming process.
1. Pre-Embalming

At anytime, day or night, the funeral professional may be called upon to do his or her job. People have a tendency to die at the most inconvenient times, and a mortician cannot wait until later to retrieve a body. This means lots of getting up at 1 AM and having to work on holidays.
When someone dies and once authorization has been granted by the family, doctor, and/or by the medical examiner, the embalmer is called to make the “removal” of the body. After filling out the appropriate paperwork the embalmer takes the body to the funeral home, and if embalming is requested or required, begins the process.
An embalming report is filled out that logs all jewelry and personal items on the body; details any discolorations, cuts, bruises, etc. on the body; and documents the procedures and chemicals used during embalming. This report can become very valuable if a deceased’s family bring a lawsuit against the funeral home.
All clothing, bandages, IV needles, catheters and such are removed. A strong disinfectant spray is used to clean the skin, eyes, mouth, and other orifices. If rigor mortis (the stiffening of muscles after death) has set in, it is relieved by moving the limbs and head about and massaging the muscles. If the decedent is a man, he is normally shaved at this point. Razor burn (yes, not even death can save you from this) is less likely before the arterial chemical firms the skin of the face. Even women and children are shaved to remove the fine “peach fuzz” we all have on our faces. This is done to avoid the makeup from collecting on the hair and making the makeup more noticeable.
2. Feature Setting
Next begins the process of placing the facial features and the body itself in the position it will remain in the casket for viewing. This is done before arterial embalming, because the body will be truly “set” - firmed in position once formaldehyde reaches the tissues.
Great care is taken to close the eyes. The traditional method for doing this involves placing a bit of cotton between the eye and eyelid. Many times after death the eyes sink back into their sockets, so small plastic “eye caps” are placed on each eye ball. A small amount of stay creme is placed on the eyecap to avoid dehydration of the eyelids. Contrary to popular myth, the eyelids are never sewn shut, but in some cases that may be glued together to prevent separation.
The mouth is closed either by tying the jaw together with a piece of suture string or by a special injector gun. With the suture method, a curved needle with a piece of suture string is threaded through the jaw below the gums, stuck through upper jaw into to the right nostril, threaded through the septum of the nose into the left nostril, and then passed back down into the mouth. The two ends of suture are tied, careful not too tightly, so that a natural appearance of the mouth is created.
To finish closing the mouth, many times a mouth former is used. A mouth former is similar to an eyecap as it has a textured side that grips the lips, but it is shaped like the mouth. A small amount of stay creme is also used on the mouth to avoid dehydration and help hold the lips in place. The mortician may also squeeze inside the mouth a little mastic compound, a paste kind of like caulk to give the mouth a better and more pleasing shape.
3. Arterial Embalming
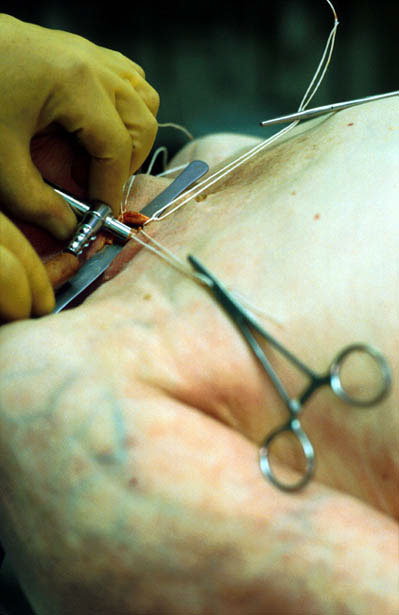
Arterial embalming is begun by injecting embalming fluid into an artery while the blood is drained from a nearby vein or from the heart. The two gallons or so needed is usually a mixture of formaldehyde or other chemical and water. In the case of certain cancers, some diabetic conditions, or because of the drugs used prior to death (where body deterioration has already begun), a stronger or “waterless” solution is likely to be used for better body preservation. Chemicals are also injected by syringe into other areas of the body.
Once the embalming fluid begins to flow into the arterial system, pressure begins to build up in the entire vascular system. This helps the fluid reach all parts of the body and penetrate into the tissues. Evidence of this can be seen in bulging veins throughout the body. The jugular drain tube is opened periodically (it is normally closed) to allow blood to escape and prevent too much pressure in the vascular system which could cause swelling. The blood drains directly into the sewer system, which sounds gross, but in reality much worse things go into our sewers.
Once arterial injection has been completed, the arterial and jugular tubes are removed, the vessels are tied closed, and the incision used to access the vessels is sutured closed and sealed with a special chemical.
4. Cavity Embalming
Arterial fluids mainly treat the skin, muscles, and organs themselves. What’s inside the organs (such as urine, bile, etc.) begins to decompose. Gases and bacteria can build up and cause distention, odor, and purge (such as brown fluids coming out of the mouth - not exactly the way you want to remember grandma). These bacteria can sometimes spread to other parts of the body, even after arterial embalming, causing decomposition problems (and then sometimes legal problems for the funeral home).
Cavity treatment starts with aspirating (suctioning) fluids out of the internal organs in the abdomen and thoracic cavity. This is accomplished this with the use of a trocar. The embalmer uses it to puncture the stomach, bladder, large intestines, and lungs. Gas and fluids are withdrawn before “cavity fluid” (a stronger mix of formaldehyde) is injected into the torso. The anus and vagina may be packed with cotton or gauze to prevent seepage if necessary. (A close-fitting plastic garment may also be used.)
These steps apply only to a body that has not been autopsied. During autopsy all the internal organs are removed and inspected by the medical examiner and then placed back inside the body or sometimes incinerated. At the funeral home, the mortician removes the viscera and places it in a plastic bag called a “viscera bag” and allows it to soak in cavity chemical. The inside of the body cavity is aspirated with a special instrument and then coated with an embalming gel and/or an embalming powder. The treated organs are then placed back inside the body or the bag full of organs gets placed at the foot end of the casket (so never try to admire a deceased’s shoes!)
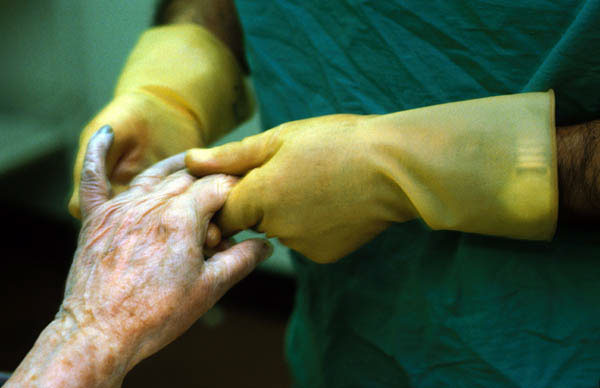
5. Post-Embalming

The body and hair are washed once more to remove any blood or chemicals and then thoroughly dried. Any restorations are done now, such as rebuilding features, masking sores or abrasions, etc. Makeup gets applied to the face, neck, and hands. Either a translucent makeup is used in normal cases or an opaque makeup is applied if the skin is discolored. In either case, the effect should be a subtle as possible to avoid Uncle Roger looking like Aunt Rose. The fingernails are trimmed. The hair is styled, either by the embalmer or by a professional hairdresser or barber.
The remains are dressed in the outfit chosen by the family. This outfit almost always includes underwear, shoes, and socks. In the case of autopsy or other difficulties, plastic undergarments are placed on the body to prevent leakage.
Finally comes casketing. The body is placed into the casket and posed in the proper position. The family normally views the body at this point and decides on any changes that need to be made. During the viewing period (which can sometimes last for several days) the embalmer will periodically check the body for signs of decomposition and takes any corrective action.
Source: Everything you ever needed to know about Embalming. Images are copyright Edmond Terakopian
Wednesday, August 27, 2008
Subscribe to:
Posts (Atom)